Project Configuration
First, obtain the latest release of SLINC from the Downloads page.
There are two formats for each release, a tar.bz2 file and a zip file. The tar.bz2 files achieve better compression and are recommended for users who will create a PRC project on a UNIX-like system because tar.bz2 files retain the proper execute permissions on the scripts. On a UNIX-like system, use the command tar xvjf slinc-*.tar.bz2 to extract the archive. The file size may seem large, but most of that space is being used by the libraries needed to build the C++ examples as well as the libraries for connecting to various types of databases.
After you have obtained the latest release of the framework, you should choose a convenient directory to work from and extract the framework release there. Note that the platform on which the project is developed has no effect on which platforms the project server and client may run on. A project developed on a Linux system can run on UNIX-like platforms, Windows platforms, or both. Similarly, a project developed in Windows can run on both Windows and UNIX-like systems. The framework itself is cross-platform, but your project will only be cross-platform if you decide to create project components that can run on both UNIX-like and Windows systems. If you develop these components in a cross-platform language like Java or Python, there is no additional work required to make your project compatible with several different platforms.
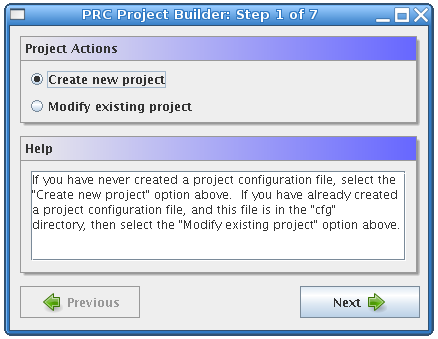
We will now explain the process of configuring a new project using the Project Builder tool. Find the files that begin with project_builder in the location where you extracted the archive. We will refer to any files with the extension .sh or .bat as scripts. The scripts ending in .sh are for use on UNIX-like systems, and those ending in .bat are for use on Windows systems. Start the Project Builder by invoking the appropriate script for your platform. In Windows this can be done by double-clicking the project_builder.bat file or by navigating to the correct directory in the Windows command prompt, typing project_builder.bat, and then pressing the Enter key. On UNIX-like systems the script should be started by navigating to the framework directory in a shell, then typing ./project_builder.sh. Running the project_builder script will start the Project Builder tool that is used to configure new or existing projects. You should see a window like the one below:
The first form in the Project Builder asks whether you want to create a new project or modify an existing project. In this case, select Create new project, and click the Next button.

On the second form you must select a project name and, optionally, an administration password for the project. There are no restrictions on the name except that it must be at least one character long. If the project is configured to use an administration password, that password will eb required when you want to perform certain restricted actions on the project. Currently, the only restricted actions are shutting the project server down and requesting data about all completed work units and results. Shutting down the project server must be done via an XML-RPC request; a password can be used so that only project administrators are able to perform this action. Retrieving all completed work units and results can result in a large database and network load, so this function is also restricted if an administration password is set.
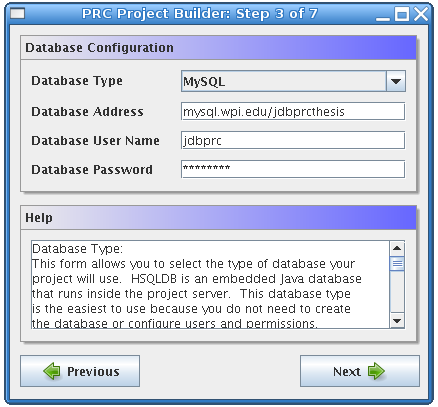
The third form allows you to configure the project database. The framework supports five types of databases: HSQLDB, MySQL, PostgreSQL, Oracle, and Microsoft SQL Server. HSQLDB is an embedded Java database that stores its data in a simple file format. Using HSQLDB is the easiest option because it does not require manually installing the database software, creating a database, and adding a user. However, the other types of databases probably outperform HSQLDB. Another limitation of HSQLDB is that only one process may access it at a time, so it is not possible to use a remote transitioner if your project uses an HSQLDB database. If you choose to use HSQLDB, the Database Address should be the location where the HSQLDB data files will be stored on disk. This address can be a relative or absolute file path. It is recommended that you place these files in the data directory; an example address for an HSQLDB database is: data/prcdb. If you want to use one of the other types of databases, you will be required to configure the database yourself, including installing the database software, creating a database for your project, and creating a user who has permissions to CREATE, DROP, SELECT, INSERT, UPDATE, and DELETE on that database. This database must be created before completing the last step in the Project Builder. To use a non-HSQLDB database you will need to enter the URL of the database in the Database Address field. The database address usually consists of the hostname of the computer that hosts the database followed by a forward slash, and then the name of the database. It is important to note that the framework may not be able to establish the database connection if an IP address is used instead of a hostname. An example of a MySQL database address is: mysql.wpi.edu/jdbprcthesis. The computer or computers on which the project server components will run must be able to access the address you enter. The User Name and Password fields must contain the user name that should be used to access the project database and the password associated with that user. It is not necessary to have a user name and password for HSQLDB databases.
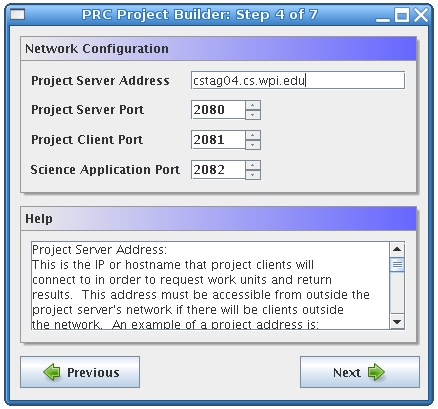
The fourth form in the Project Builder is used for configuring project network settings. The Project Server Address field is the IP address or fully qualified domain name that all project components will use to contact the server. Examples of valid server addresses are cstag04.cs.wpi.edu or 130.215.29.35. Of course the computer on which the project server will run must actually have this address or the other components will not be able to connect to the project server. Also note that all server components and client components must be able to access this address. If there will be clients outside of your local area network, you must make sure that they will be able to connect to the server address that you will use. The Project Server Port is the TCP port on which the project server will listen for XML-RPC connections from the project client and other server components. The Project Client Port is the TCP port on which the project client will listen for XML-RPC connections from the science application. The project client listens on the localhost address, so there is no need to configure this parameter. The Science Application Port is the TCP port on which the science application will listen for XML-RPC connections from the project client or server. Since the science application is not provided by the framework, the science application developer must make sure that the science application actually listens on this port. It is also important to verify that the port numbers you have chosen will be available on the computers on which each component will run. Keep in mind that the science application will run on the same computer as the project client, and the science application may also run on the same computer as the project server if the project is configured to use spot-checking. Since different components may run on the same machine, it is necessary to use different port numbers for the project server, project client, and science application.
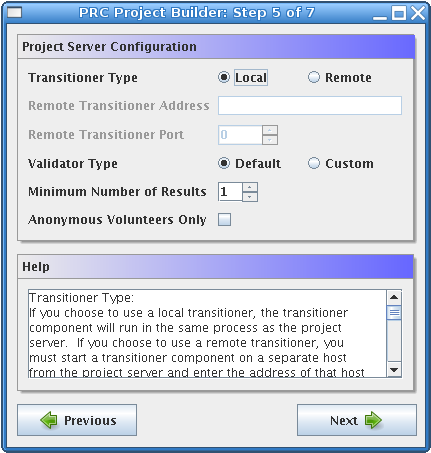
The next form is the project server configuration. The first part of this form is the transitioner configuration. The transitioner is a server component that keeps track of all work units and results in the project. You will almost always want to use a local transitioner, which will cause the transitioner to run as part of the project server. However, if the computer on which the project server is running is experiencing extreme performance problems, you have the option to run the transitioner on a different computer, as long as that computer can connect to the project server. To use a remote transitioner, click the Remote radio button, and then enter the address for the computer on which the transitioner will run. The format of the transitioner address is the same as that of the project server. For example, a valid transitioner address would be cstag04.cs.wpi.edu or 130.215.29.35. The Remote Transitioner Port is the port number on which the transitioner should listen. This port should be different from all of the other ports you have configured. The next part of the form is for configuring the type of result validator your project will use. You can either use the default validator, which simply marks all results returned by clients as valid, or you can choose to implement your own result validator. If you want to implement your own result validator, choose Custom for the validator type. You do not need to configure any address or port for the custom validator because the server never needs to connect to the validator. The validator simply polls the server on a regular basis, asking if there are any results that need to be validated. The last part of the form is the Minimum Number of Results value. This setting controls the number of results that must be received for each work unit before that work unit may be retired. You may want to use a value greater than one if you are writing a custom validator. In that case, your validator will be able to compare all of the results that have been returned for the same work unit and choose a single one of those results to be the canonical result. The canonical result is the one result that is accepted for a given work unit. All other results for that work unit are discarded after the canonical result has been chosen. Using a minimum number of results that is greater than one with a custom validator can be used as a way of identifying incorrect results by comparing results returned by different users. It is important to realize that, as the minimum number of results increases, the efficiency of your public resource computing project decreases because the same work unit is being computed multiple times. Also, if the number of users participating in the project is smaller than the minimum number of results, no work units would ever be retired because a work unit cannot be assigned to the same user twice. The Anonymous Volunteers Only checkbox determines whether each user will be required to register with the project before downloading work units or if no user registration will take place. If the checkbox is checked it means that all users will contribute anonymously, all sharing the user name anonymous, and therefore they will not be prompted to register with the project the first time the client is started. If the checkbox is not checked, all users will be required to register with a user name and e-mail address the first time the client is started.
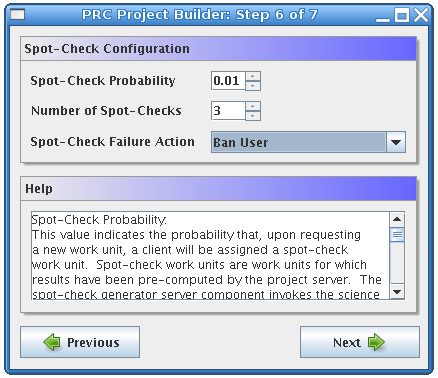
The sixth form is the spot-check configuration. A spot-check is a method used to identify malicious users, called saboteurs. A saboteur is defined as a user who deliberately sends invalid results to the project server. When spot-checking is used, the project server computes the result for one or more work units by invoking the project�s science application. The results it computed are referred to as spot-check results and are assumed to be valid because they have been computed by a trusted source, the server. The work units from which the spot-check results were computed are called spot-check work units. Once one or more spot-check results have been computed, the server can send a spot-check work unit to a client, which will not know that the work unit it received is a spot-check. The validator can then compare the result returned by that client to the accepted spot-check result. If the validator determines that the result returned by the client is not valid, the user who submitted that result is identified as a saboteur. Once a saboteur has been identified, the project server can take actions to mitigate the risk introduced by that user. The first value in the form, Spot-Check Probability, allows you to specify the probability that any given client will be assigned a spot-check work unit when it requests a new work unit. This value should be between zero and one. The next configurable parameter is the Number of Spot-Checks. This value specifies how many spot-check results the server should generate. You may want to have more than one spot-check if you are concerned that a single spot-check work unit will eventually be identified by saboteurs, who will return the correct result upon receiving that work unit, circumventing the spot-check. Generally you will want to specify a small value here, between one and three, unless you suspect that saboteurs are trying to identify the spot-check work units in order to evade detection. The Spot-Check Failure Action determines what course of action the project server will take once a saboteur has been identified. If a saboteur is identified, this event will be logged to the spot-check log file, called spotcheck.log in the log directory. If this is the only action you wish the server to take, select Log Only. Another option is to ban the identified user. When a user is banned, that user will no longer be able to request new work units or return results. The third option is to both ban the user and delete all results that user has previously returned. This is the most extreme action you can take against identified saboteurs. If the saboteur submitted a result that was later chosen as the canonical result for a work unit, deleting that result means that the associated work unit will have to be recomputed by other users.
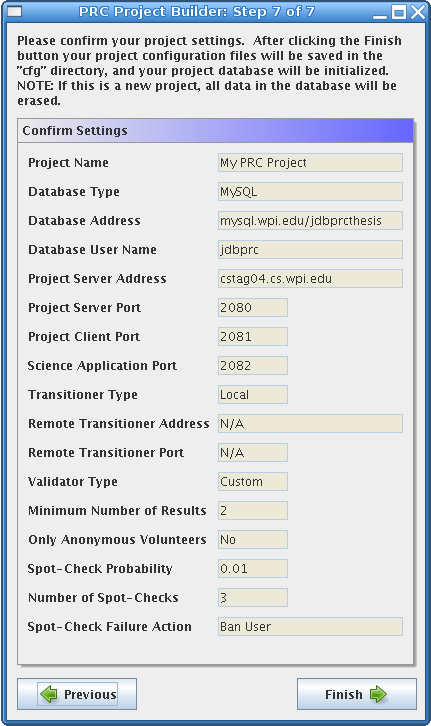
The last step in the Project Builder is to confirm your settings. At this point you can go back to any previous form and change the information. When you have confirmed your settings, the project configuration files will be saved to disk in the cfg directory, and the project database will be initialized. Please note that initializing the project database will erase any data that it currently contains. If you are modifying an existing project, the database will have already been initialized, so this step will not be performed. When the Project Builder has finished configuring and initializing your project, you can begin developing project-specific components or preparing your project distribution files if you have already created the project-specific components.
Before developing your own project components, you may wish to first practice creating a project using the example components provided by the framework. The C++ and Java example components are located in the example directory after the framework file has been extracted. There is a folder for the C++ implementation and a separate folder for the Java implementation. Each of these folders has a build script that compiles the example source files and, if necessary, any libraries that are needed by the examples. The script also creates client and server directories. To create a project using the example components, first run the build script in either the C++ or Java example directory, then copy the client and server directories with all of their subdirectories to the main framework directory. The main framework directory is the directory where you extracted the framework. You can then continue to Preparing Project Distribution Files. Note that you must have the Java Development Kid (JDK) version 1.5 or later installed to compile the example Java project, and the JAVA_HOME environment variable must be set to the path to your JDK installation directory.
| Prev | Home | Next |